Setting Up
-
[ad_slider autoplay=”true” interval=”8″ count=”5″]
-
2. Downloading
Download Outline Client for Ubuntu GNU/Linux
Get Outline Client .AppImage for Linux[ad_slider autoplay=”true” interval=”8″ count=”5″]If possible choose directly ‘Open with AppImageLauncher’.
-
3. Running App
Then Launch Outline Client for Ubuntu
If the AppImageLauncher Wizard Pop Up then Choose between ‘Run’ and ‘Integrate and Run’: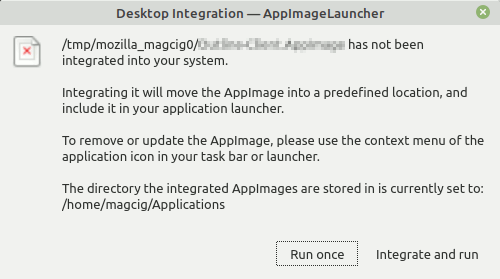
The Outline Client App Integration grant also the desktop Launcher Creation.
Otherwise Launch it with a simple Double-Click.
Instead, to Run Outline Client without AppImageLauncher Setup.
Make a Folder to Hold the AppImages with:mkdir $HOME/Applications
Then Switch Outline Client into the Location:
mv ~/Downloads/Outline-Client*.AppImage ~/Applications
Finally, to Run it Double-Click or from Command Line:
~/Applications/Outline-Client*.AppImage
[ad_slider autoplay=”true” interval=”8″ count=”5″]
Contents