Setting Up
-
2. Installing Network Printer
How to Install Network Printer on GNU/Linux desktops
-
3. Setting Up Smb Configuration File
Download Smb Configuration File for Manjaro GNU/Linux
Right-Click on Page and Choose “Save as…” Naming it as “smb.conf“.
This because the Manjaro Linux Package Do Not include it!
Then Replace it into the Default Location with:sudo mv ~/Downloads/smb.conf /etc/samba/
Last to Fix Ownership run:
sudo chown -R root:root /etc/samba/smb.conf
-
4. Installing Samba Server
Now to Setup Samba Server on Manjaro
Simply play:sudo pacman -Syu samba
Next to Start the Samba Server Service run:
sudo systemctl start smb nmb
Possibly to Start it at Boot:
sudo systemctl enable smb nmb
Last, to check it’s running:
systemctl status smb
But if you use a Firewall then to Setup it check the ArchWiki Docs.
-
5. Configuring Samba
Then to Configure Samba Server
So first edit the main configuration file with nano Editor:sudo nano /etc/samba/smb.conf
Enable the following two entries:
browseable = yes
guest ok = yes
Use Ctrl+w to Search for “browseable” on nano.
Eventually for large Printing best to enable the spoolssd service, adding to the “[global]” Section:rpc_server:spoolss = external rpc_daemon:spoolssd = fork
Last use Ctrl+x to Save & Exit from nano Editor!
Finally, Restart Samba with:sudo systemctl restart smb nmb
-
6. Adding Samba Printer
Follow to Add Samba-shared Printer in Windows Client
First, Open file explorer and enter the IP address of the Manjaro computer in the address bar like:\\192.168.0.110
In case to find your Manjaro machine IP Network Address issue in Terminal:
ifconfig
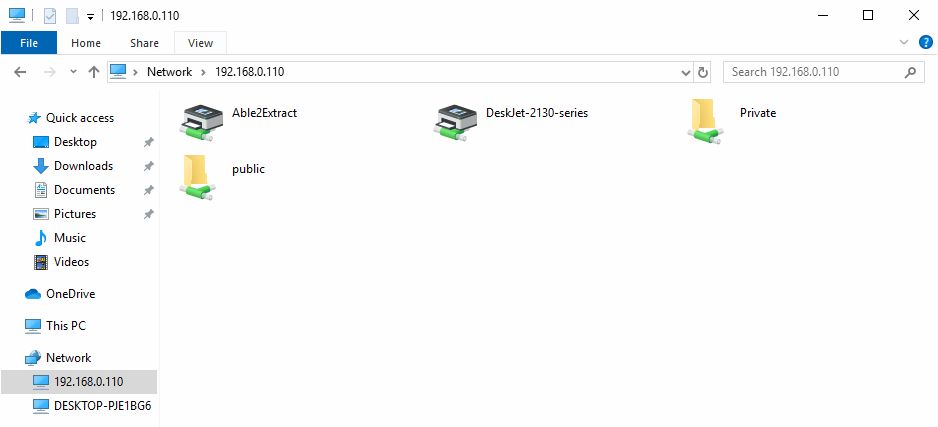
And then the printer should be discovered and listed, here below the Windows 10 Setup example:

Now Double-click the Printer to Add it to your Windows system.
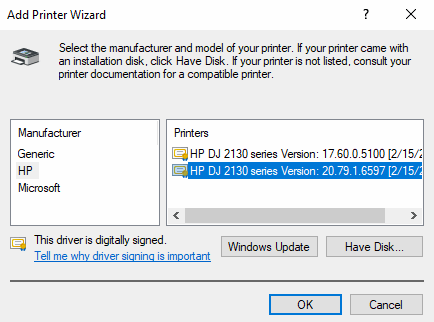
And the again select the OK button to choose a Driver to install:
Congratulations, finally the Printer should be successfully added to your Windows system!
Contents