GNU/Linux Fedora Custom Partitiong – Step-by-step Guide
Hi! This tutorial will guide you step-by-step on How to Custom Partitioning a GUID/GPT Formatted Disk for Fedora 35/36/37/38/39/40/41/42/Rawhide GNU/Linux Desktop Installation on a Microsoft Windows or macOS PC.
And this Custom Partitioning on Fedora is intended for a Dual Boot Setup on a modern Computer with Microsoft Windows or macOS OSes.
Because nowadays on the UEFI based Devices the GUID system have replaced the Legacy MBR.
Especially relevant: the Fedora Setup on a GPT Partition Table in a BIOS Machine Require a Boot Volume is made prior to Installation.
So the Fedora Installation on a GPT Device require a little BIOS Boot Partition of 1/2Mb of Size.
Finally, this process is intended to be made by a Fedora Live OS.

1. Making BIOS Boot Partition
So we need to Setup a little BiosBoot Partition
First, on Wizard choose the Advanced Custom Setup:Then choose the Free Space and use the ‘+ to Add a Volume: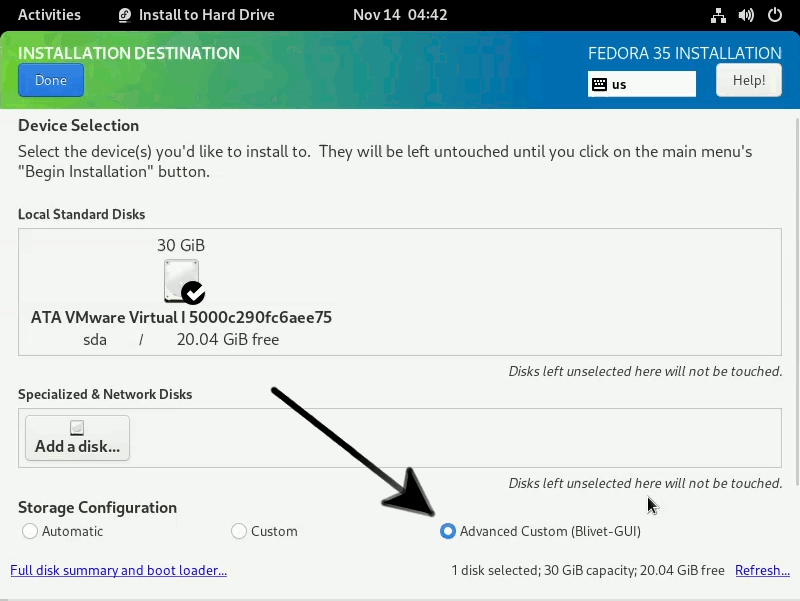 Now from the Fylesystem Drop-down select BIOS Boot:
 Confirm changes with
2. Making Root Partition
Next make the Main Partition
This is where the entire OS File System will reside.
So like before Add it:Now you have some different GNU/Linux Format type as:- ext2
- ext3
- ext4
But to make it simply you can just Confirm the proposed ext4 formatting:Again you need to Set the Mountpoint as ‘/‘!
A Label is purely Optional.
Choose the wanted Size leaving, if possible, from 2 to 32 Gb for the Swap Space.
This depending from your Machine RAM Size, increase it linearly with it, for more insight see: An introduction to Swap Space Space in Linux Systems.
To know how the Swap is Not Required but it is useful because the Linux Kernel move some ever used Stuff into it.
Confirm changes with3. Making Swap Partition
Last, create the Swap Space
At this point you already know how to make it:Again from the Drop-down choose swap:And then Set an acceptable Size.
Confirm with
Finally, Accept Changes with :And again :And in a few moments your Hard Drive is Ready for Installation. :)