$schemamarkup = get_post_meta(get_the_ID(), 'schemamarkup', true); if(!empty($schemamarkup)) { echo $schemamarkup; }

How to Install Canon ImageCLASS LBP162dw Printer on Linux Mint

February 8, 2022 | By the+gnu+linux+evangelist.

GNU/Linux Mint Canon imageCLASS LBP162dw Printer Setup – QuickStart Guide

[xyz-ihs snippet=”336AdTop”]

Hi! The Tutorial shows you Step-by-Step How to Install Canon imageCLASS LBP162dw Printer in GNU/Linux Mint LTS Desktop.

And the Canon imageCLASS LBP162dw Mint Driver Setup It’s quick and easy because it only involves running a few Basic Shell Commands.

Especially relevant: after the Driver Installation to achieve the Printer Setup follow guidance to Add Printer!

The Canon imageCLASS Series Printer use by default the UFRII Driver that is the 2nd version of UFR (Ultra Fast Render), non-standard rendering engine that is functionally similar to Postscript and PCL.

Featured
  1. 1. Downloading Canon LBP162dw Driver

    Download Canon LBP162dw Mint Driver

    Canon LBP162dw Ufrii Driver
    [xyz-ihs snippet=”234Ad1″]
    If you are using Firefox then on Prompt Choose “Open with Archive Manager”:
    Firefox Prompt
    Or After try to Select the Package by the Downloads Button on Top Panel:
    Downloaded Packages
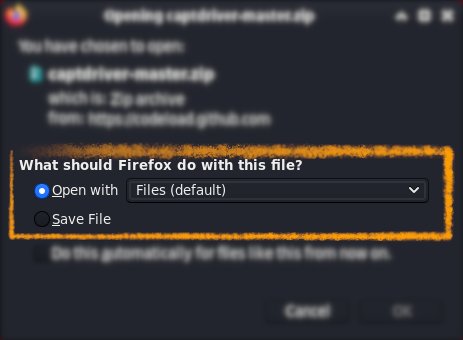
    Instead, on Google-Chrome simply try to Choose the Package on the Bottom Panel:
    Chrome Bottom Panel Downloads
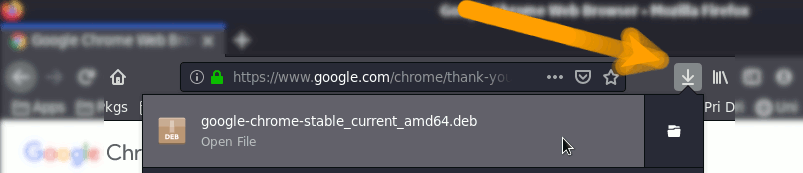
    How to Install Chrome Browser on Mint
[xyz-ihs snippet=”336Ad0″] [nextpage title=”Installing Driver”] [xyz-ihs snippet=”336Ad1″]
  1. 2. Terminal Getting-Started Guide

    How to QuickStart with Command Line on Mint GNU/Linux:

    Console Mint Linux QuickStart Guide
    [xyz-ihs snippet=”234Ad1″]
  2. 3. Extracting Canon LBP162dw Driver

    Then when needed Extract the Driver Package
    Possibly Double-Click/Right-Click on the File Manager and Open with Archive Manager:

    Extraction
    Or from Shell simply like:
    tar xvzf ~/Downloads/linux-UFRII*tar.gz -C /tmp/
  3. 4. Installing Canon LBP162dw Driver

    Now to Install Canon LBP162dw Ufrii Driver:
    First, Change to the Target Directory:

    cd /tmp/linux-UFRII*
    Or in case may be instead:
    cd /tmp/linux-UFRII*/linux-UFRII*

    And then Run the Installation Script with:

    sudo ./install.sh
    Give your Admin Pass to Start with the Installation Process…
    Simply Follow the Instructions on CLI.
    The Script should Find out the Needed Stuff Solving all the Packages Dependencies!
    Last, you are prompted to register your Printer in System:
    Done
[xyz-ihs snippet=”336Ad0″] [nextpage title=”Adding Printer”] [xyz-ihs snippet=”336Ad1″]
  1. 5. Accessing Printer Settings

    Then Launch Printers Configure App
    So on Mate/Cinnamon/Xfce simply start typing “printer” in the left-bottom Menu Search:

    How to Add Printer in Linux Mint Cinnamon Desktop - Device Manager

    Possibly, Check if the Printer is Turn On & Connected
  2. 6. Adding Printer

    Next Choose Add
    And Follow with the Wizard’s Setup…

    How to Add Printer in Linux Mint Cinnamon Desktop - Device Manager
    Again Browse to “Install PPD File” Driver:

    How to Find Printer PPD File Location on Mint

    GNU/Linux Mint PPD File Location
    [xyz-ihs snippet=”234Ad2″]
    Or Else Find it in the “Printers Database”.

Tags: , , , , , , , , , , , , , , , , , , , , , , , , , , , , , , , , , , , , , , , , , , , , , , , , , , , , , , , , , , , , , , , , , , , , , , , , , , , , , , ,

Comments are closed here.