GNU/Linux Ubuntu Epson FAX Setup – Step-by-step Guide
How to Install Epson Printer with FAX on Ubuntu-Based GNU/Linux desktops – Step by step Tutorials.
And the guide includes also detailed instructions on How to Add Printer and Get Started Faxing.
This Guide is valid for all the Ubuntu-based Distros like:
- Linux Mint
- Zorin OS
- Lubuntu
- Elementary OS
- Kde Neon
- Pop_OS!
- Xubuntu
- Linux Lite
- Bodhi
- Kubuntu
- LXLE
- Trisquel
- Voyager Ubuntu
- feren OS
- Peppermint
- Linux Ultimate Edition (You may just need to Discover what’s the Parent Release)

-
1. Launching Terminal
Open a Terminal window
Ctrl+Alt+t on desktop
(Press “Enter” to Execute Commands)
And then Update Linux Ubuntu Repositories:
This step is a precaution in case the sources are not Up to Date.
So if you prefer try first to Install it directly like shown here below…sudo apt update
-
2. Downloading Epson Driver
Download Ubuntu Epson GNU/Linux FAX Driver
On Firefox prompt if possible Select directly “Open with Ubuntu Software Center”!
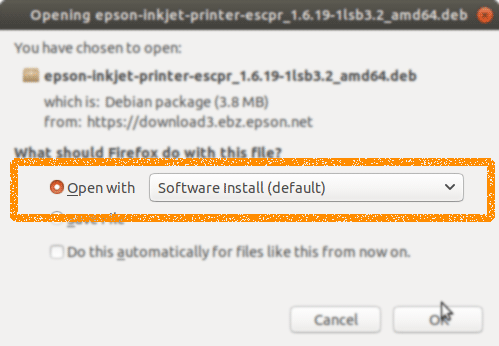
Or with Chrome Click on Bottom’s Button, otherwise Double-Click on it in the File Manager.
Finally, if you Prefer the Command Line Setup then simply ‘Save’ it and follow the Instructions here Below.
Contents