GNU/Linux Debian Epson WF-2510/WF-2520 Printer Setup – Step by step Guide
How to Install Epson WorkForce WF-2510/WF-2520 Printer/Scanner/FAX on Debian-Based GNU/Linux desktops – Step by step Tutorials.
And to Install Epson WF-2510/WF-2520 Printer on Debian you need to Setup the Proprietary Driver.
Especially relevant: after the Driver Installation to achieve the Printer Setup follow guidance to Add Printer!
Using the Epson Printer Utility Software, you can check Ink Levels, View Error and other Status…
This Guide is valid for all the Debian-based Distros like:
- Kali
- Deepin
- MX Linux
- antiX
- Parrot
- SparkyLinux
- Q4OS
- LMDE
- MakuluLinux
- Netrunner
- Voyager
- Elive
- Steam OS (In this case then Check How to Add Printer on GNU/Linux desktops!)
Finally, the guide includes also detailed instructions on How to Get Started Epson Scanning & Faxing.

-
1. Launching Terminal
Open a Terminal window
(Press “Enter” to Execute Commands)
And then Update Debian Bullseye Repositories:
This step is a precaution in case the sources are not Up to Date.
So if you prefer try first to Install it directly like shown here below…sudo apt update
-
2. Downloading Epson WF-2510/WF-2520 Driver on Debian
Download Debian Epson GNU/Linux Driver
On Firefox prompt if possible Select directly “Open with Debian Software Center”!
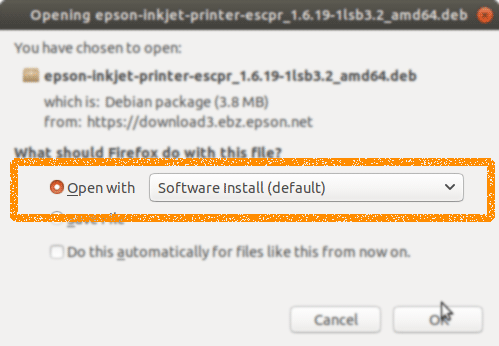
Or with Chrome Click on Bottom’s Button, otherwise Double-Click on it in the File Manager.
Finally, if you Prefer the Command Line Setup then simply ‘Save’ it and follow the Instructions here Below.
Contents