Installing Driver
-
4. Installing Brother MFC-J497DW Printer Driver
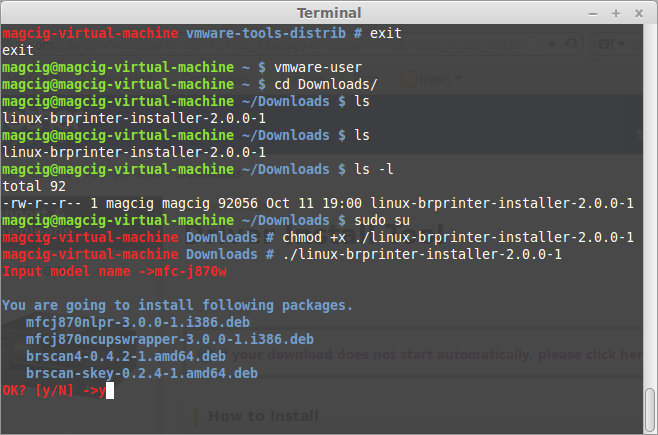
Then to Install Brother Printer Drivers
First, access the Target Folder:cd /tmp
And then give Execution Permission with:
chmod +x linux-brprinter-installer*
If Got “User is Not in Sudoers file” then see: How to Enable sudo
Now to Install it play:sudo ./linux-brprinter-installer*
In case of “CUPS is not installed” issue then to see How to Install it Here.
When Prompted Insert your Brother Printer Model!

Then the Installer will Provide Automatically to Download and Install the Printer and potentially also the Scanner Drivers…
Especially relevant: in case of Issue try first to Enable the 32-bit Architecture:sudo dpkg --add-architecture i386
Then make the needed Directory with:
sudo mkdir -p /var/spool/lpd
Again you can try to Grab all the .deb Packages as explained before in the Download Step.
Then access the Target Folder, usually with:cd ~/Downloads
To Check it’s there List the contents with:
ls . | grep cupswrapper
The grep Command refine the output List showing only the Entries matching the Keyword.
But if you are in Trouble to Find the Location on Terminal then See: How to Access Downloads Folder from Browser.
And last, Install them with:sudo apt install ./*br*.deb ./*cupswrapper*.deb ./*lpr*.deb
Next Run again the Installation Script as in the beginning!
Again following the CLI wizard, when Prompted about a Device URI:- For a USB Connection Simply Enter “n”!
-
For a Network Shared Connection Setup Go to: http://localhost:631/printers/
Select the Printer
Select “Modify Printer”
Enter your sudo Username & Pass
Select the Protocol and Continue…
For Help see Instructions on:
http://localhost:631/help/network.html
Contents