GNU/Linux Ubuntu 21.10 Building Kernel 5.18 from Source Code Guide
Hi! This tutorial will guide you step-by-step on How to Build and Install a New Custom Kernel 5.18 from Source Code in Ubuntu 21.10 Impish GNU/Linux.
And this Ubuntu 21.10 Kernel 5.18 Setup make use of the latest Source Code.
Especially relevant: on Ubuntu Desktop you may instead see the Easier Kernel Update by the Mainline Kernel Installation GUI.
Again this tutorial make it the Easy Way and so is intended especially for Beginners.
Possibly, a very good Alternative for Desktops is represented by the ready-made XanMod and Liquorix Kernel Setup.
Important to know how this Setup does Not change your existing System and so in any case you will be able to startup with the current Kernel from the GRUB Splash Screen.
For further advanced Kernel Configuration instructions you may see the Linux Kernel Documentation.
Finally, for a Non Bootable System before see How to chroot on Ubuntu GNU/Linux Tutorial.

1. Installing Dependencies
Open a Terminal Shell emulator window
(Press “Enter” to Execute Commands)sudo apt update && sudo apt upgrade
Authenticate with the User Admin Pass.
If Got “User is Not in Sudoers file” then see: How to Enable sudo.How to QuickStart with Command Line on Ubuntu GNU/Linux
Reboot:sudo reboot now
And then play:sudo apt install build-essential libncurses5-dev fakeroot xz-utils libelf-dev
2. Making Target Directory
Now make the Target Folder
With:mkdir ~/kernel
3. Downloading Linux Kernel
Download Linux Kernel 5.18 Source Code for Ubuntu GNU/Linux
Grab the tar.xz or tar.gz Archive from the List.4. Extracting Linux Kernel Archive
Then Extract Linux Kernel into /tmp Directory
First, access the Target:cd ~/kernel
Then to untar the downloaded Kernel Source into the current Folder run:tar -xafv ~/Downloads/linux-source*.tar.xz
5. Configuring Kernel
So now to Configure Ubuntu Linux Custom Kernel
First, access the Kernel Source with::cd linux*
Then copy the current Configuration File into the New Kernel Source:sudo find /boot/ \( -iname "*config*" -a -iname "*`uname -r`*" \) -exec cp -i -t ./ {} \;
mv *`uname -r`* .config
This mystics because the default Configuration File may have a variable composition including “config” and the Kernel Version. In case of a Chrooted System instead yuo may look up the available Kernels with:ls /boot | grep config
The grep Command refine the output List showing only the entries Matching the Keyword.
Again fix the Configuration File editing it with nano and commenting out like:sudo nano .config
Use Ctrl+w to search for “CONFIG_SYSTEM_TRUSTED_KEYS” on nano.
And comment out the Line like:#CONFIG_SYSTEM_TRUSTED_KEYS
Ctrl+x to Save & Exit.
Else to reconfigure the Kernel use:sudo make menuconfig
For instructions see: How to Configure a Build Kernel.
6. Building Kernel
Next to Build Ubuntu Linux Custom Kernel
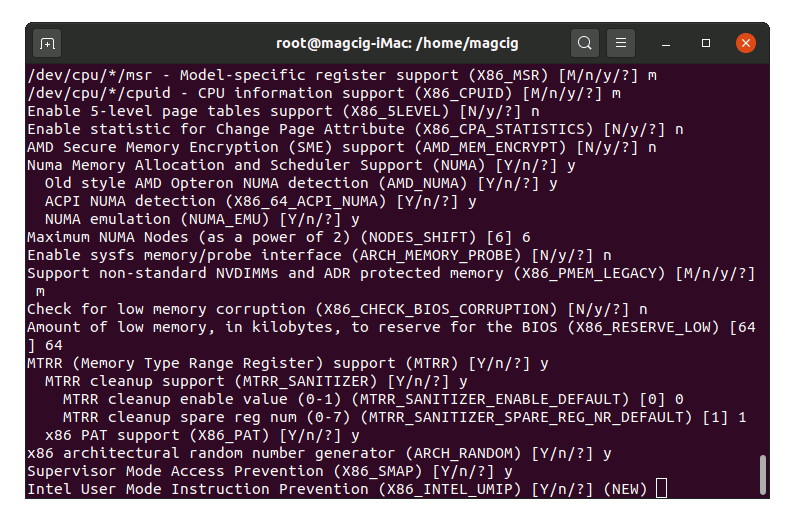
Make it with:sudo make clean
And then:sudo make deb-pkg LOCALVERSION=-custom KDEB_PKGVERSION=$(make kernelversion)-1
When prompted if uncertain then simply follow to hit until the end.
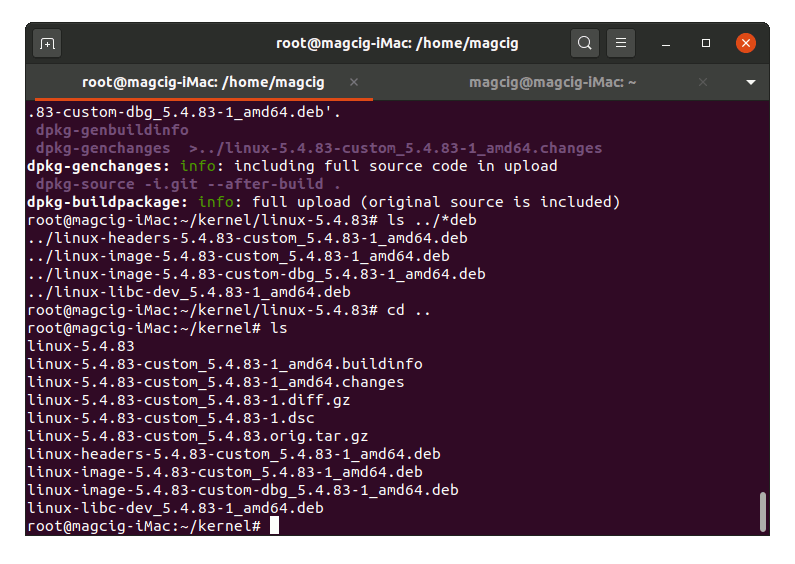
Last, to check the builded Images play:ls ../*.deb | grep image
7. Installing Kernel
Finally, to Install Ubuntu Linux Custom Kernel
Simply play:sudo dpkg -i ../linux-image*custom_*.deb ../linux-headers*.deb
And this setup includes also the Custom Kernel Headers that you don’t will find online…
And finally reboot with:sudo reboot now
Finally, you should boot into your barely new Ubuntu Linux Kernel :) To check it run:uname -r
In case of Issues you still can choose the previous one on the GRUB Splash Screen.8. Updating Firmware
How to Update Linux Devices Firmware on GNU/Linux
Especially relevant: this setup is optional and may be required only to make use of some New Device Drivers not available in your current Firmware.