How to Install macOS on VirtualBox VM
-
3. Downloading macOS Installation Script
Download macOS Installation Script for VirtualBox on Debian GNU/Linux
On Top-Right Corner choose to Download Raw!
And Save it into the VirtualBox VMs Folder.
Many Thanks to the MySpaghetti Develope! :D -
3. Running macOS Installer
Now to Run macOS Installation Script
First, make a Target Directory to hold all the Stuff Downloaded during Setup:mkdir /[PATH/2/VMS]/macOS
Replace /[PATH/2/VMS] with your current VirtualBox VMs Path in the above.
And store it into the Target:mv ~/Downloads/macos-guest-virtualbox.sh /[PATH/2/VMS]/macOS
But if you are in Trouble to Find it out on Terminal then See: How to Access Downloads Folder from Browser.
Next access it:cd /[PATH/2/VMS]/macOS
Give execution permissions:
chmod +x macos-guest-virtualbox.sh
And then Play it with:
./macos-guest-virtualbox.sh
Confirm for Installation on the Interactive CLI Wizard.
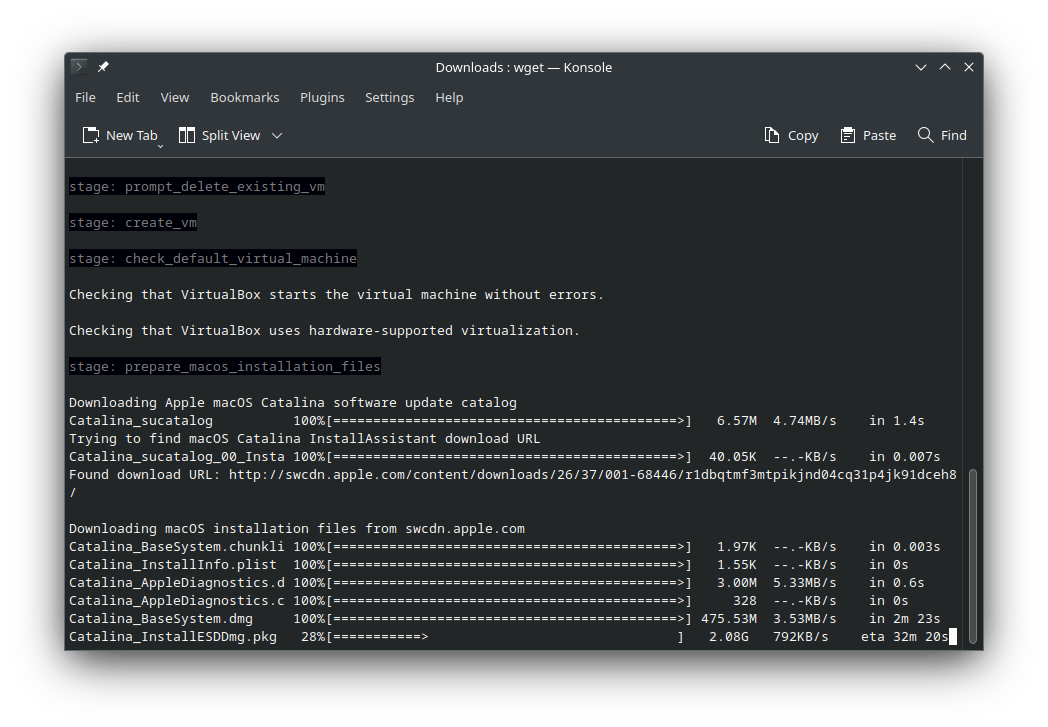
Now take a Break until the VirtualBox VM Start to Boot automatically…
Easily the First Boot will Fails.
So try to Restart it with this Command:VBoxManage modifyvm macOS --cpu-profile "Intel Xeon X5482 3.20GHz"
For more insight see the Documentation with:
./macos-guest-virtualbox.sh documentation | less -R
-
4. Making Virtual Disk
Now Make & Format Installation Virtual HD
(This Step is missing in the current Script and it’s my Personal Hacking Contribute :)
So Power Off the Machine and access Settings >> Storage
Then Create a HD of about 40Gb and Pre-alocated Full Size (That’s just as I did…)) br />
First, Choose the “+” Add Hard Drive on Top-Right:
Then Create on Top-Left:

Confirm the Default File Type:

Check the Pre-allocate Full Size:

Select and to Attach it:

And you are Done! :)

Re-Start the VM.
And after Launch the Disk Utility:
Next, Choose the created Disk and Format it as HFS+:

Last, let’s go Reboot your macOS VM!
-
4. Installing macOS
So after Re-Start follow the macOS Installation Wizard

Choose the Language:

Then Reinstall OS:

Again confirm for “Install macOS Catalina”:

Agree to the License:

Choose the created Hard Drive:

Take a Break of about 30min while the System is Installing:

Last, after Automatic Re-boot the Setup will be achieved in some Minutes:

-
5. Configuring macOS
After the successfull Setup easily make the macOS Configuration
Simply follow up with the Wizard:
Then Read the POST-INSTALLATION SETUP at the Bottom!


ESPECIALLY RELEVANT: After the Installation is successfully achieved you should Manually Detach the Installation Drive.
So go in Settings >> Storage and Remove All but the OS Disk that you have created in the Former Step!
Finally, to achieve this Setup after Re-Booting again you need to Access on the Top-Left Menu Choose Startup Disk and Switch to the Installation one.
This to be Sure your VM will follow to Boot Up also if some Settings is changed.
Finally Enjoy your VirtualBox macOS Catalina VM! :)
Contents