Boost Email Deliverability with DKIM Setup on Arch GNU/Linux
How to set up DKIM on Arch GNU/Linux Servers – Step by step Tutorials.
Learn how to set up DKIM on Arch Linux to boost email security and improve email deliverability for your Postfix mail server.
DKIM (DomainKeys Identified Mail) is an email authentication method that helps secure your emails and increase deliverability on Ubuntu mail servers.
And DKIM works by adding a digital signature to outgoing emails, allowing recipients to verify the email’s authenticity and ensure it hasn’t been altered during transmission.
Moreover, this Setup is valid for all the Arch-Based Distros like:
- Manjaro
- CachyOS
- EndeavourOS
- Garuda
- BigLinux
- ArcoLinux
- Archman
- Bluestar
- Archcraft
- ArchLabs
- ArchBang
- BlackArch
- Artix

Setting up DKIM is a crucial step for any Linux server administrator who wants to protect their domain from email spoofing and phishing attacks. By implementing DKIM, you are adding a layer of trust that email receivers can use to verify that your messages are legitimate and haven’t been tampered with in transit.
Along with SPF (Sender Policy Framework) and DMARC (Domain-based Message Authentication, Reporting & Conformance), DKIM forms part of a modern email authentication trio designed to improve overall email deliverability and security. Each plays a distinct role, and together they significantly reduce the chances that your emails will end up in spam folders.
On Arch Linux, the process of setting up DKIM can be streamlined by using tools such as OpenDKIM, which simplifies key generation, signing, and DNS record configuration. OpenDKIM integrates well with popular mail servers like Postfix, ensuring that outgoing emails are automatically signed with your domain’s private key.
Proper DKIM configuration is essential to protect domain reputation and maintain email deliverability. Major email providers like Gmail and Outlook use DKIM verification to decide whether to accept, reject, or flag messages.
In this Arch DKIM tutorial, you’ll learn to generate DKIM keys, update DNS records, configure OpenDKIM on Arch Linux, and integrate it with Postfix. This ensures your emails are properly signed, more trustworthy, and more likely to reach the inbox.
Understanding DKIM importance and implementing it correctly can prevent email deliverability issues and domain blacklisting. It’s a critical best practice for any server sending email for a domain.
Whether you manage a personal mail server or handle small business email, this step-by-step guide offers clear instructions with no advanced skills required. Follow along to have DKIM set up on Arch quickly and efficiently.
Lastly, Using Google Mail Relay ensures reliable email delivery with strong SMTP authentication and TLS encryption, improving email security and reducing spam risks by leveraging Google’s trusted mail servers.
1. Update System Packages
Update Package Lists and upgrade installed Packages for latest Security and Features:
sudo pacman -Syu
If the kernel is updated, reboot with:
sudo reboot
2. Install Postfix, OpenDKIM and SASL Modules
Install Mail Server, DKIM Signer, and Authentication Support:
sudo pacman -S postfix opendkim cyrus-sasl
3. Edit Postfix Main Configuration
Open main.cf to set Gmail SMTP Relay, enable TLS and SASL authentication:
sudo nano /etc/postfix/main.cf
Add or modify these lines inside:
# SASL authentication
smtp_sasl_auth_enable = yes
smtp_sasl_password_maps = hash:/etc/postfix/sasl_passwd
smtp_sasl_security_options = noanonymous
smtp_sasl_tls_security_options = noanonymous

# TLS (required by Gmail)
smtp_use_tls = yes
smtp_tls_CAfile = /etc/ssl/certs/ca-bundle.crt
smtp_tls_session_cache_database = btree:${data_directory}/smtp_scache
Then find and amend these ones:
relayhost = [smtp.gmail.com]:587
smtp_tls_security_level = encrypt
Use Ctrl+w to Search in nano ;)
4. Create SASL Password File
Specify your Gmail Email and App Password for SMTP authentication:
sudo nano /etc/postfix/sasl_passwd
Add this line (replace with your credentials):
[smtp.gmail.com]:587 yourgmail@gmail.com:your_app_password
Enable Double-Authentication to Create a Google App Pass
5. Secure and Hash SASL Password File
Restrict Permissions and create Postfix Lookup Database:
sudo chmod 600 /etc/postfix/sasl_passwd
sudo postmap /etc/postfix/sasl_passwd
6. Restart Postfix Service
Apply the new Postfix Settings:
sudo systemctl restart postfix
7. SPF Setup for Your Domain
Add an SPF TXT DNS Record to authorize your mail server IP for sending emails:
v=spf1 ip4:yourip -all
This record should be added in your DNS management console as a TXT record for the domain itpromo.xyz.
8. Configure OpenDKIM Main Settings
Edit OpenDKIM Config to enable Signing and specify Key Location:
sudo nano /etc/opendkim.conf
Ensure it contains or add:
Syslog                  yes
Canonicalization        relaxed/simple
Mode                    sv
SubDomains              no
Socket                  local:/var/run/opendkim/opendkim.sock
PidFile                 /var/run/opendkim/opendkim.pid
OversignHeaders         From
9. Generate DKIM Keys
Create Key Directory and generate DKIM Keys for your domain:
sudo mkdir -p /etc/opendkim/keys/yourdomain.com
Replace yourdomain.com with your actual domain, e.g. itpromo.xyz.
sudo opendkim-genkey -D /etc/opendkim/keys/yourdomain.com/ -d yourdomain.com -s default
sudo chown -R opendkim:opendkim /etc/opendkim/keys/yourdomain.com
10. Create KeyTable, SigningTable and TrustedHosts Files
Define which Keys to use and Trusted Hosts for signing:
sudo nano /etc/opendkim/key.table
Example content:
default._domainkey.yourdomain.com yourdomain.com:default:/etc/opendkim/keys/yourdomain.com/default.private
sudo nano /etc/opendkim/signing.table
Example content:
*@yourdomain.com default._domainkey.yourdomain.com
sudo nano /etc/opendkim/trusted.hosts
Example content:
127.0.0.1
::1
localhost
mail.localdomain
localdomain
*.yourdomain.com
11. Link OpenDKIM Config to KeyTable, SigningTable and TrustedHosts
Edit OpenDKIM Config to use the created files and set Socket and User:
sudo nano /etc/opendkim.conf
Add or verify:
KeyTable                /etc/opendkim/key.table
SigningTable            /etc/opendkim/signing.table
ExternalIgnoreList /etc/opendkim/trusted.hosts
InternalHosts /etc/opendkim/trusted.hosts
12. Configure Postfix to Use OpenDKIM Milter
Edit Postfix to integrate OpenDKIM for signing outgoing mails:
sudo nano /etc/postfix/main.cf
Add:
# OpenDKIM config
milter_default_action = accept
milter_protocol = 6
smtpd_milters = unix:/var/run/opendkim/opendkim.sock
non_smtpd_milters = unix:/var/run/opendkim/opendkim.sock
13. Restart and Enable OpenDKIM Service
Activate OpenDKIM for mail signing:
sudo systemctl restart opendkim
sudo systemctl enable opendkim
14. Restart Postfix Service to Apply Milter
Reload Postfix to use OpenDKIM Milter integration:
sudo systemctl restart postfix
15. Add DKIM TXT Record in Your DNS
Publish the contents of default.txt as a TXT DNS Record:
Host:default._domainkey
Value:v=DKIM1; k=rsa; p=[MYKEY]:The important part to copy into your DNS TXT record is everything inside the quotes after p=…
To extract it, run:
sed -n '/default._domainkey/{n; s/^[ \t]*"//; s/"[ \t]*$//; p; :a; n; /^[ \t]*".*"/ { s/^[ \t]*"//; s/"[ \t]*$//; H; ba }; x; s/
//g; s/\r//g; p }' /etc/opendkim/keys/yourdomain.com/default.txt | tr -d '
' | sed 's/)//'
16. Test DKIM Key
Verify the DKIM Key Setup is correct:
sudo opendkim-testkey -d yourdomain.com -s default -vvv
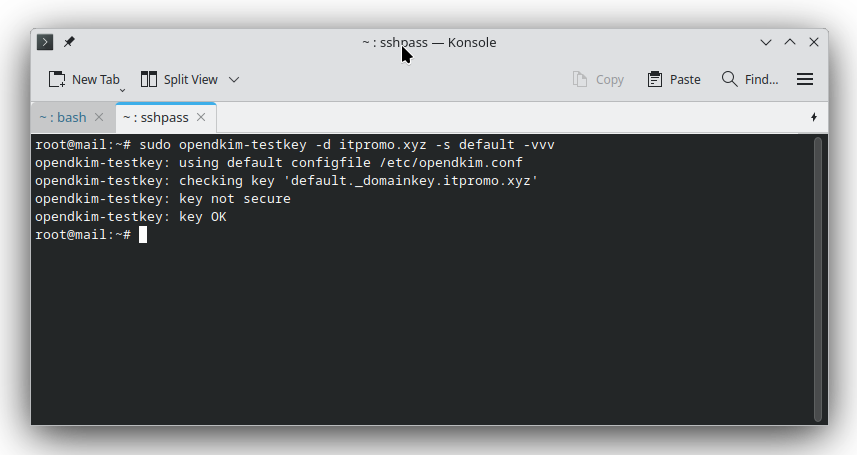
- The “key not secure” warning is informational; it does not prevent DKIM from working.
- To remove “key not secure,” you’d need to enable DNSSEC on your domain registrar/DNS provider, which is optional.