Oracle JDK 10 Install Deepin GNU/Linux
Hello Deepin Linux User! The Tutorial shows you Step-by-Step How to Download and Install Oracle JDK 10 on Deepin GNU/Linux Desktop.
And to SetUp Oracle JDK for Deepin you will need to Use the update-alternatives Tool to Update your System Java to 1.10 JDK 10.
- A local-variable type inference
- A clean garbage collector interface
- Parallel full garbage collection
- Enabling HotSpot to allocate the object heap on an alternative memory device
- Enabling the Grall Java-based just-in-time compiler experimental in Linux/x64
- Consolidation of the repositories of the JDK forest into a single one
- Application class-data sharing, for executing a callback on threads without performing a global VM safepoint
- Thread-local handshakes
- Provision of a default set of root certificate authority certificates in the JDK
Finally, the Contents and Details of Oracle JDK 10 on Deepin Linux Install are Expressly Minimal to Give Focus Only to the Essentials Instructions and Commands and Make the Tut Easier to Understand ;)

-
Open a Terminal Shell Emulator Window
Ctrl+Alt+t
(Press “Enter” to Execute Commands)
In case first see: Terminal QuickStart Guide.
-
Download Oracle Java SE JDK 10 for Linux.
-
Double-Click on the tar.gz Archive and Extract into /tmp
Or from Shell:tar xvzf ~/Downloads/jdk-10*.tar.gz -C /tmp/

-
Relocate Java JDK 10.
su -
If Got “User is Not in Sudoers file” then see: How to Enable sudo
Make a jvm Directory if Not already there withif [ ! -d "/usr/lib/jvm" ]; then mkdir /usr/lib/jvm; fi
Set the root superUser as owner:
sudo chown -R root:root /tmp/jdk-10*
Reiterate the Execution Permission over the Java binaries:
chmod -R +x /tmp/jdk-10*/bin
Finally, Shift the Java contents with:
mv /tmp/jdk-10* /usr/lib/jvm/
-
Installing Oracle Java JDK 10
You can directly Copy & Paste the Commands into Terminal..update-alternatives --install /usr/bin/java java /usr/lib/jvm/jdk-10*/bin/java 1065
update-alternatives --install /usr/bin/javac javac /usr/lib/jvm/jdk-10*/bin/javac 1065
update-alternatives --install /usr/bin/jar jar /usr/lib/jvm/jdk-10*/bin/jar 1065
update-alternatives --install /usr/bin/javaws javaws /usr/lib/jvm/jdk-10*/bin/javaws 1065
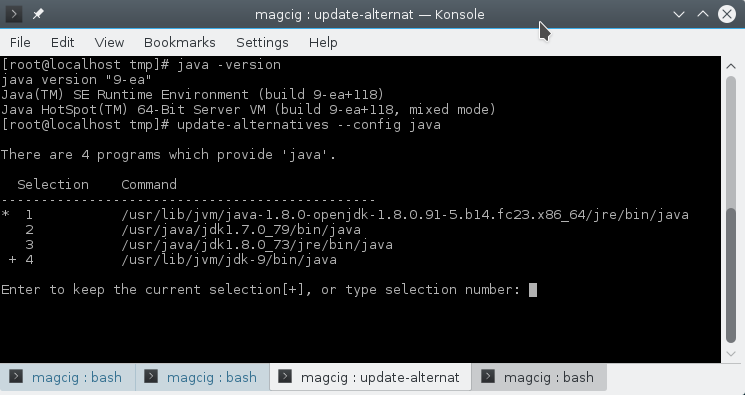
Checking or Setting the System Java Version in Use with
update-alternatives --config java
And for the Java Compiler instead:
sudo update-alternatives --config javac
To Switch of Java Version Just Enter the Selection Number on First, Column. :)
-
(Optional) Setting JAVA_HOME User Environment Variable.
su [myUserName]
Edit the Bash environment Configuration file
nano $HOME/.bashrc
Append:
export JAVA_HOME=/usr/lib/jvm/jdk-10*
Possibly to Check the JDK 10 exact PATH use in another window:
ls /usr/lib/jvm/
Ctr+x to Save & Exit from nano Editor :)
Load New Bash Config:bash
-
Finally, Test New Java JDK 10 Installation.
java -version
Java IDEs Installation on Deepin Linux
Eclipse IDE for Java Development Install on Deepin Linux: Installing Eclipse IDE for Java Dev on Deepin Linux.
Netbeans IDE for Java Development Install on Deepin Linux: Installing NetBeans IDE for Java Dev on Deepin Linux.
IntelliJ IDEA 2024 for Java Development Install on Deepin Linux: Installing IntelliJ IDEA for Java Dev on Deepin Linux.
Now Thanks to Oracle-Sun Corporation you are able to Successfully Start Up with Java 10 Development.
Welcome to Java 10 New Dev Env! ;)