GNU/Linux openSUSE Adding CUDA Repository
Hello openSUSE User! The Guide shows you Step-by-step How to Add NVIDIA CUDA Toolkit Repository for openSUSE 15+ GNU/Linux 64-bit Desktop.
And the OpenSUSE CUDA Install is a Parallel Computing Platform and Programming Model invented by NVIDIA.
It enables dramatic Increases in Computing Performance by harnessing the power of the graphics processing unit (GPU).

1. Launching Terminal
Open a Terminal Shell session
(Press “Enter” to Execute Commands)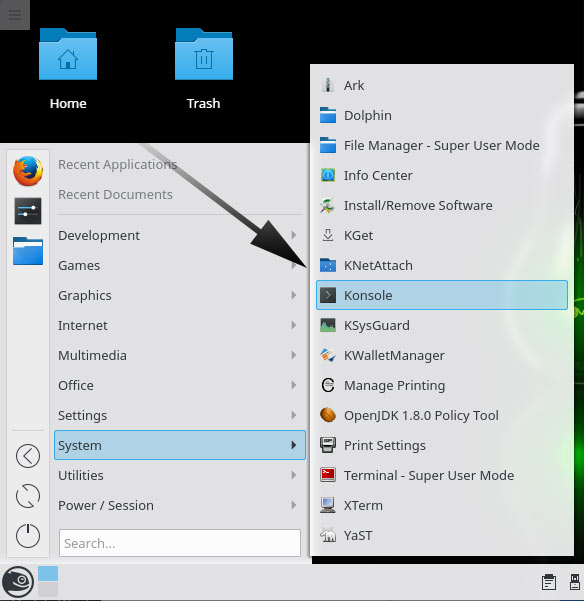
2. Downloading NVIDIA CUDA Repo
Then Download CUDA Repository for openSUSE
Choose the openSUSE Release.
And at this time for Tumbleweed Grab the 15 Link.
So when not available get the nearest Release.
Then Navigate to the x86_64 folder and Grab cuda-opensuse*.repo Package.3. Installing NVIDIA CUDA Repo
Then to Install on openSUSE
First, access the target directory usually:cd && cd Downloads
Check that is there with:
ls . | grep cuda
The grep Command refine the output List showing only the entries Matching the Keyword.
But if you are in Trouble to Find it Out on Terminal See: How to Access Downloads Folder from Browser.
And then play:sudo mv cuda-opensuse*.repo /etc/zypp/repos.d/
Fix permissions with:sudo chown -R root:root /etc/zypp/repos.d/
Refresh Repos with:sudo zypper refresh
Finally, Add User to Video group:sudo usermod -a -G video [username]
4. Installing Dependencies
Finally, Install Required Packages
Kernel Headers:sudo zypper in -v kernel-default-devel=$(uname -r | sed 's/\-default//')
And GCC:
sudo zypper in gcc
5. Installing NVIDIA CUDA
How to Install CUDA Toolkit on Red Hat Linux